Case Study: Hybrid Model (3D-Printing + Traditional Finishes)
 

Maynooth University Students’ Union Building - Scott Tallon Walker Architects

3D Traditional Printing

It might be safe to say that architectural models are less of a mainstay of architects’ offices than they formerly were. These days, you’re more likely to trip over an electric scooter than a design model. 

That might come across as a strange thing to say coming from a model-making business, but when CGIs, animations, immersive experiences are now both possible inhouse (albeit to varying standards) and comparatively more affordable then it was almost inevitable that this would happen in a world that often focuses on efficiency over process. 

It’s also likely safe to say that 3D printing of architectural models has been an area dabbled in by many and for many of those; never dabbled in again. Deterred by poor experiences, poor results and high costs; 3D printing has also been relegated in some departments to  ‘’not quite good enough/not quite there yet”.

Fixie has slowly been working to debunk this myth and the former truth. The end product that navigates these criticisms is a hybrid model: one that is enabled by 3D printing and finished where required or desired, by hand and traditional methods. When combined with the improved working methods, 3D/BIM-3Dprint workflows these models offer consistency, detail, affordable complexity and hopefully a degree of surprise. 

Early concept render of Maynooth University’s Student Union Complex by Scott Tallon Walker Architects.

Early concept render of Maynooth University’s Student Union Complex by Scott Tallon Walker Architects.

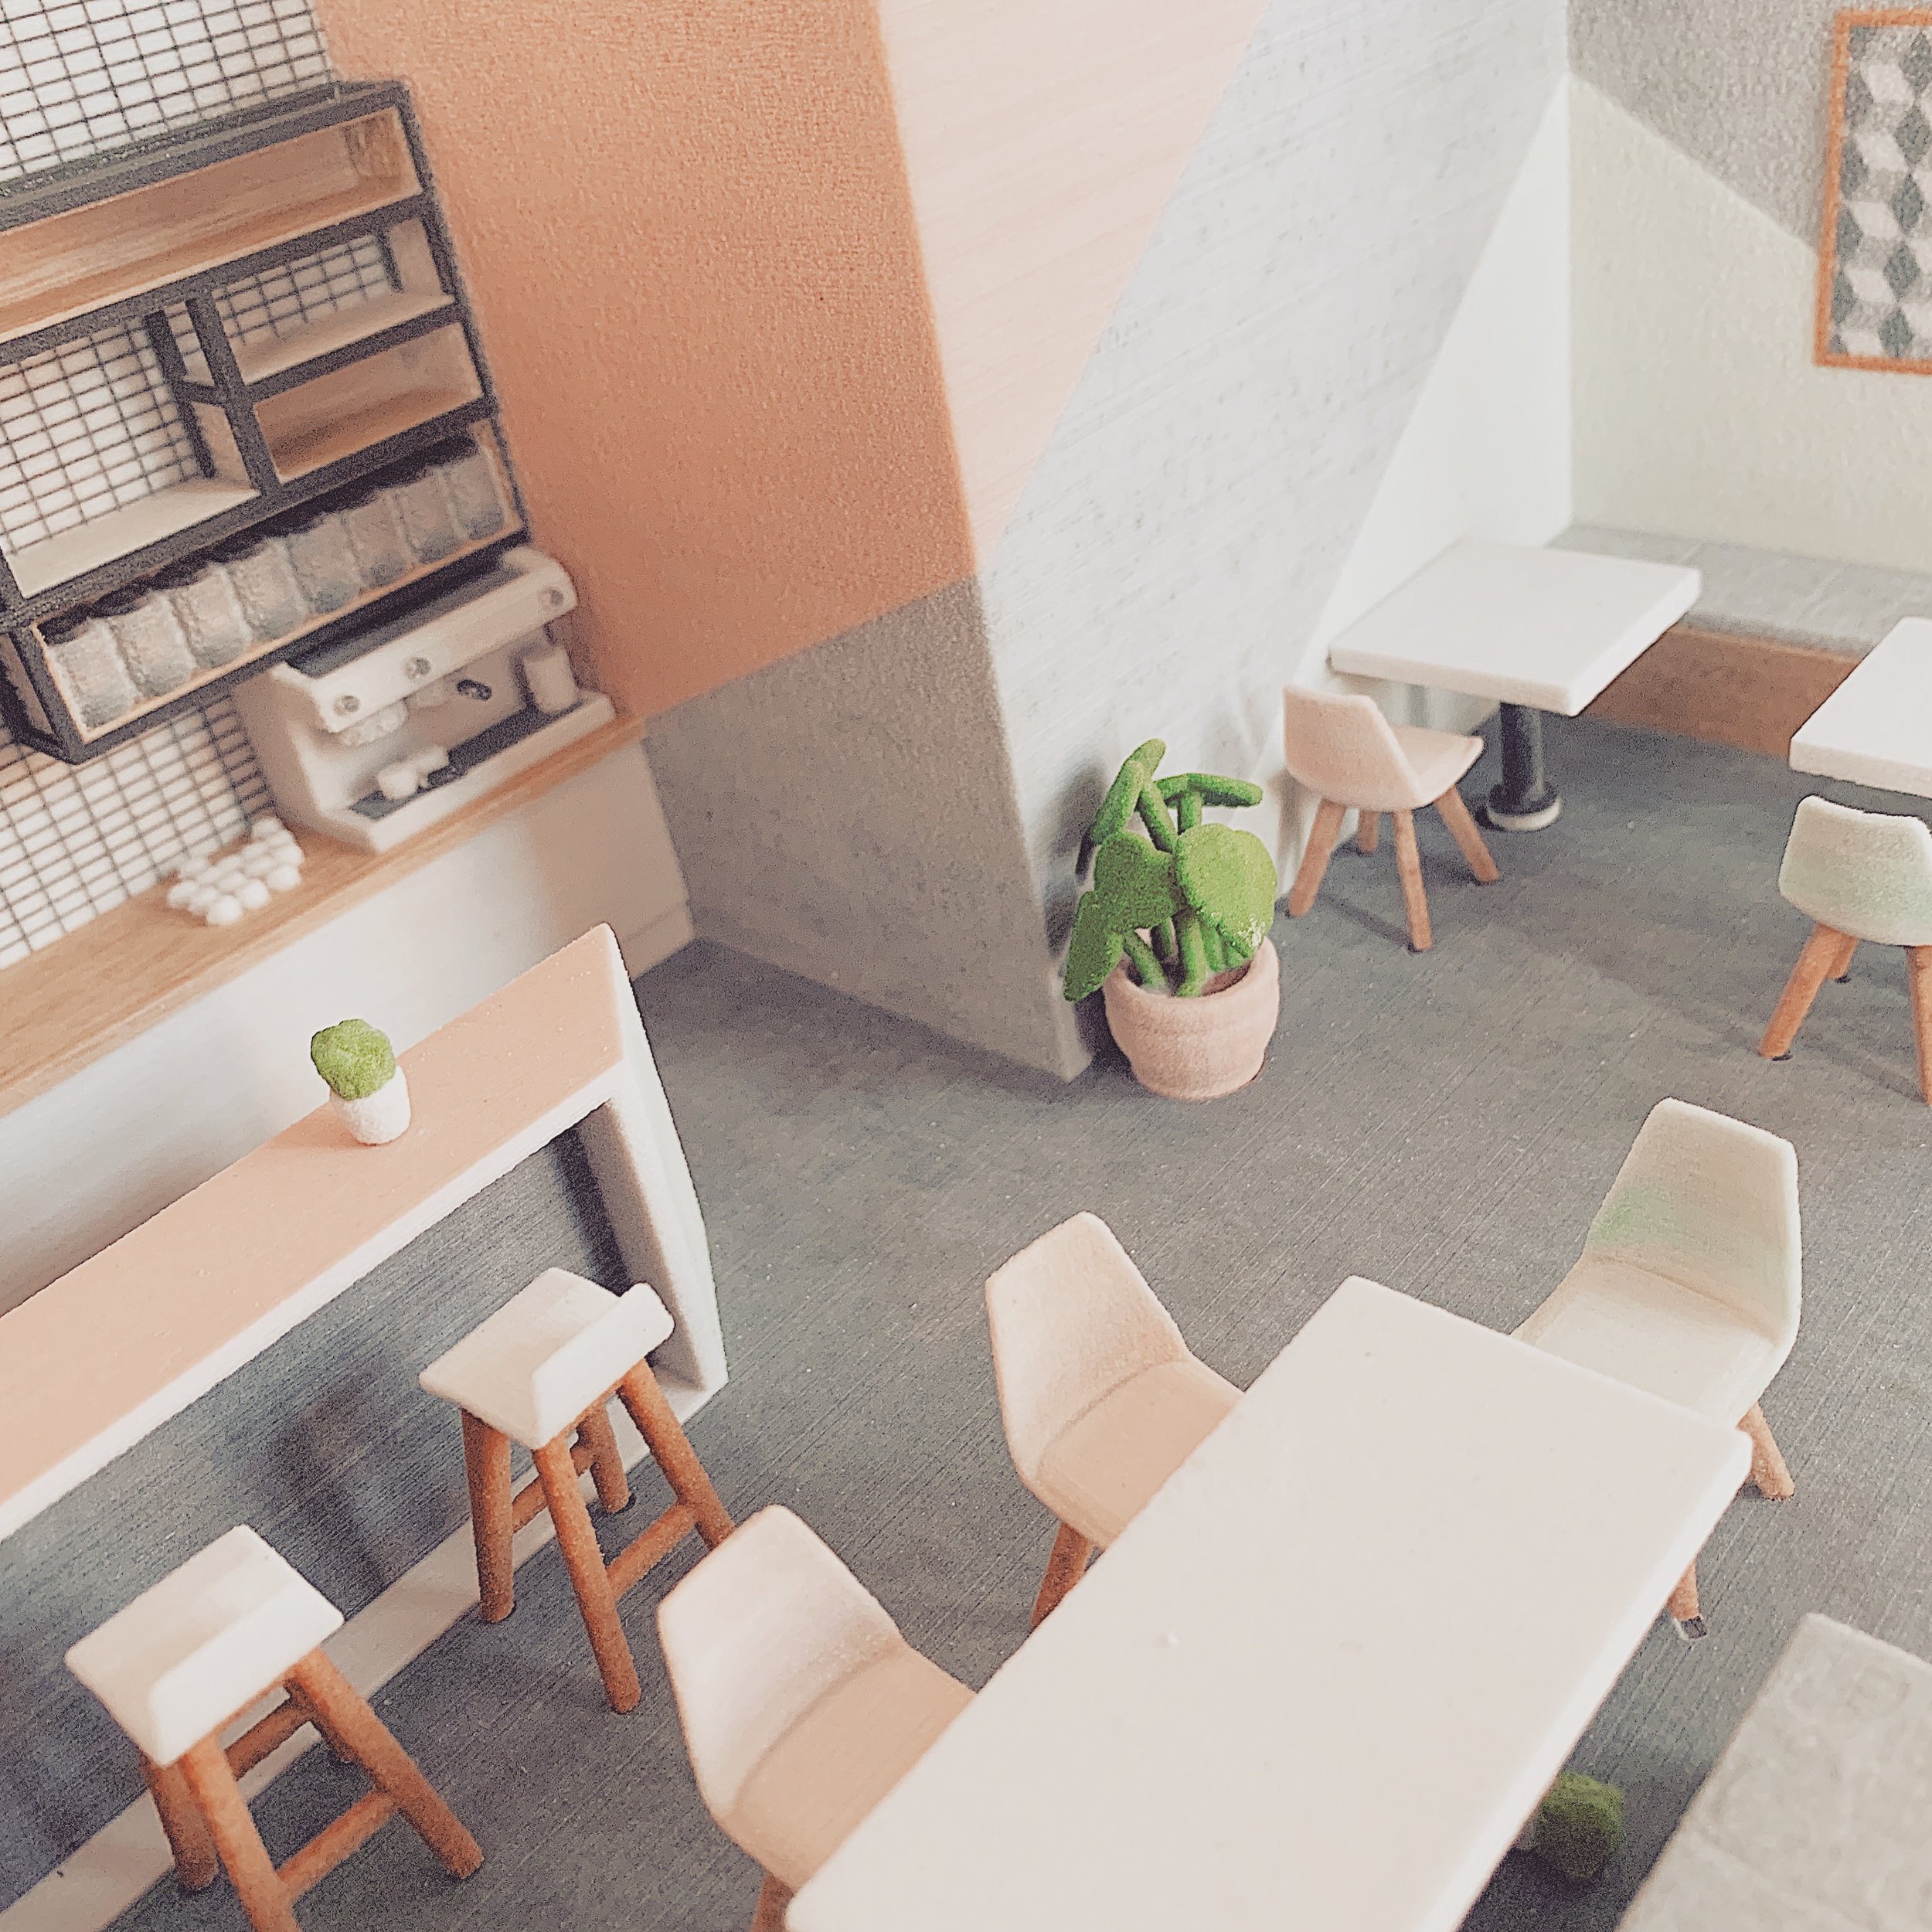
Of course, you’d probably be more likely to believe us if you saw an example of this for yourself. The following case study focuses on Maynooth’s Student Union Building (MSU) a project by one of Ireland’s largest and most well-established design practices: Scott Tallon Walker Architects. The brief for the model will not seem that unusual to most - an affordable model that demonstrated some of the key finer details of the facade and the shared covered space. 

3D Traditional Printing

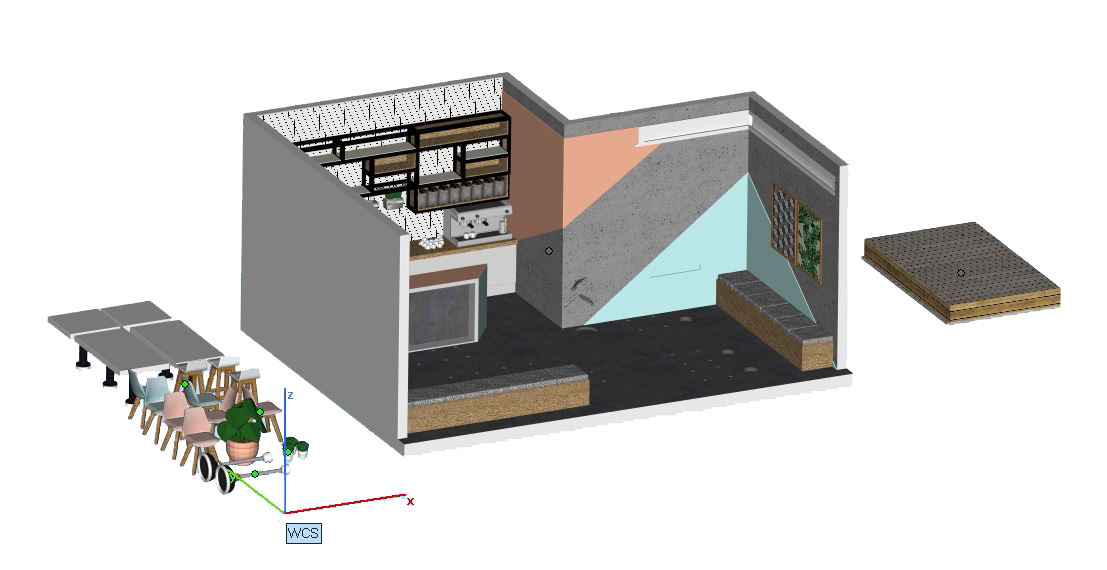
Imported 3D information, cleaned up and prepared for printing.

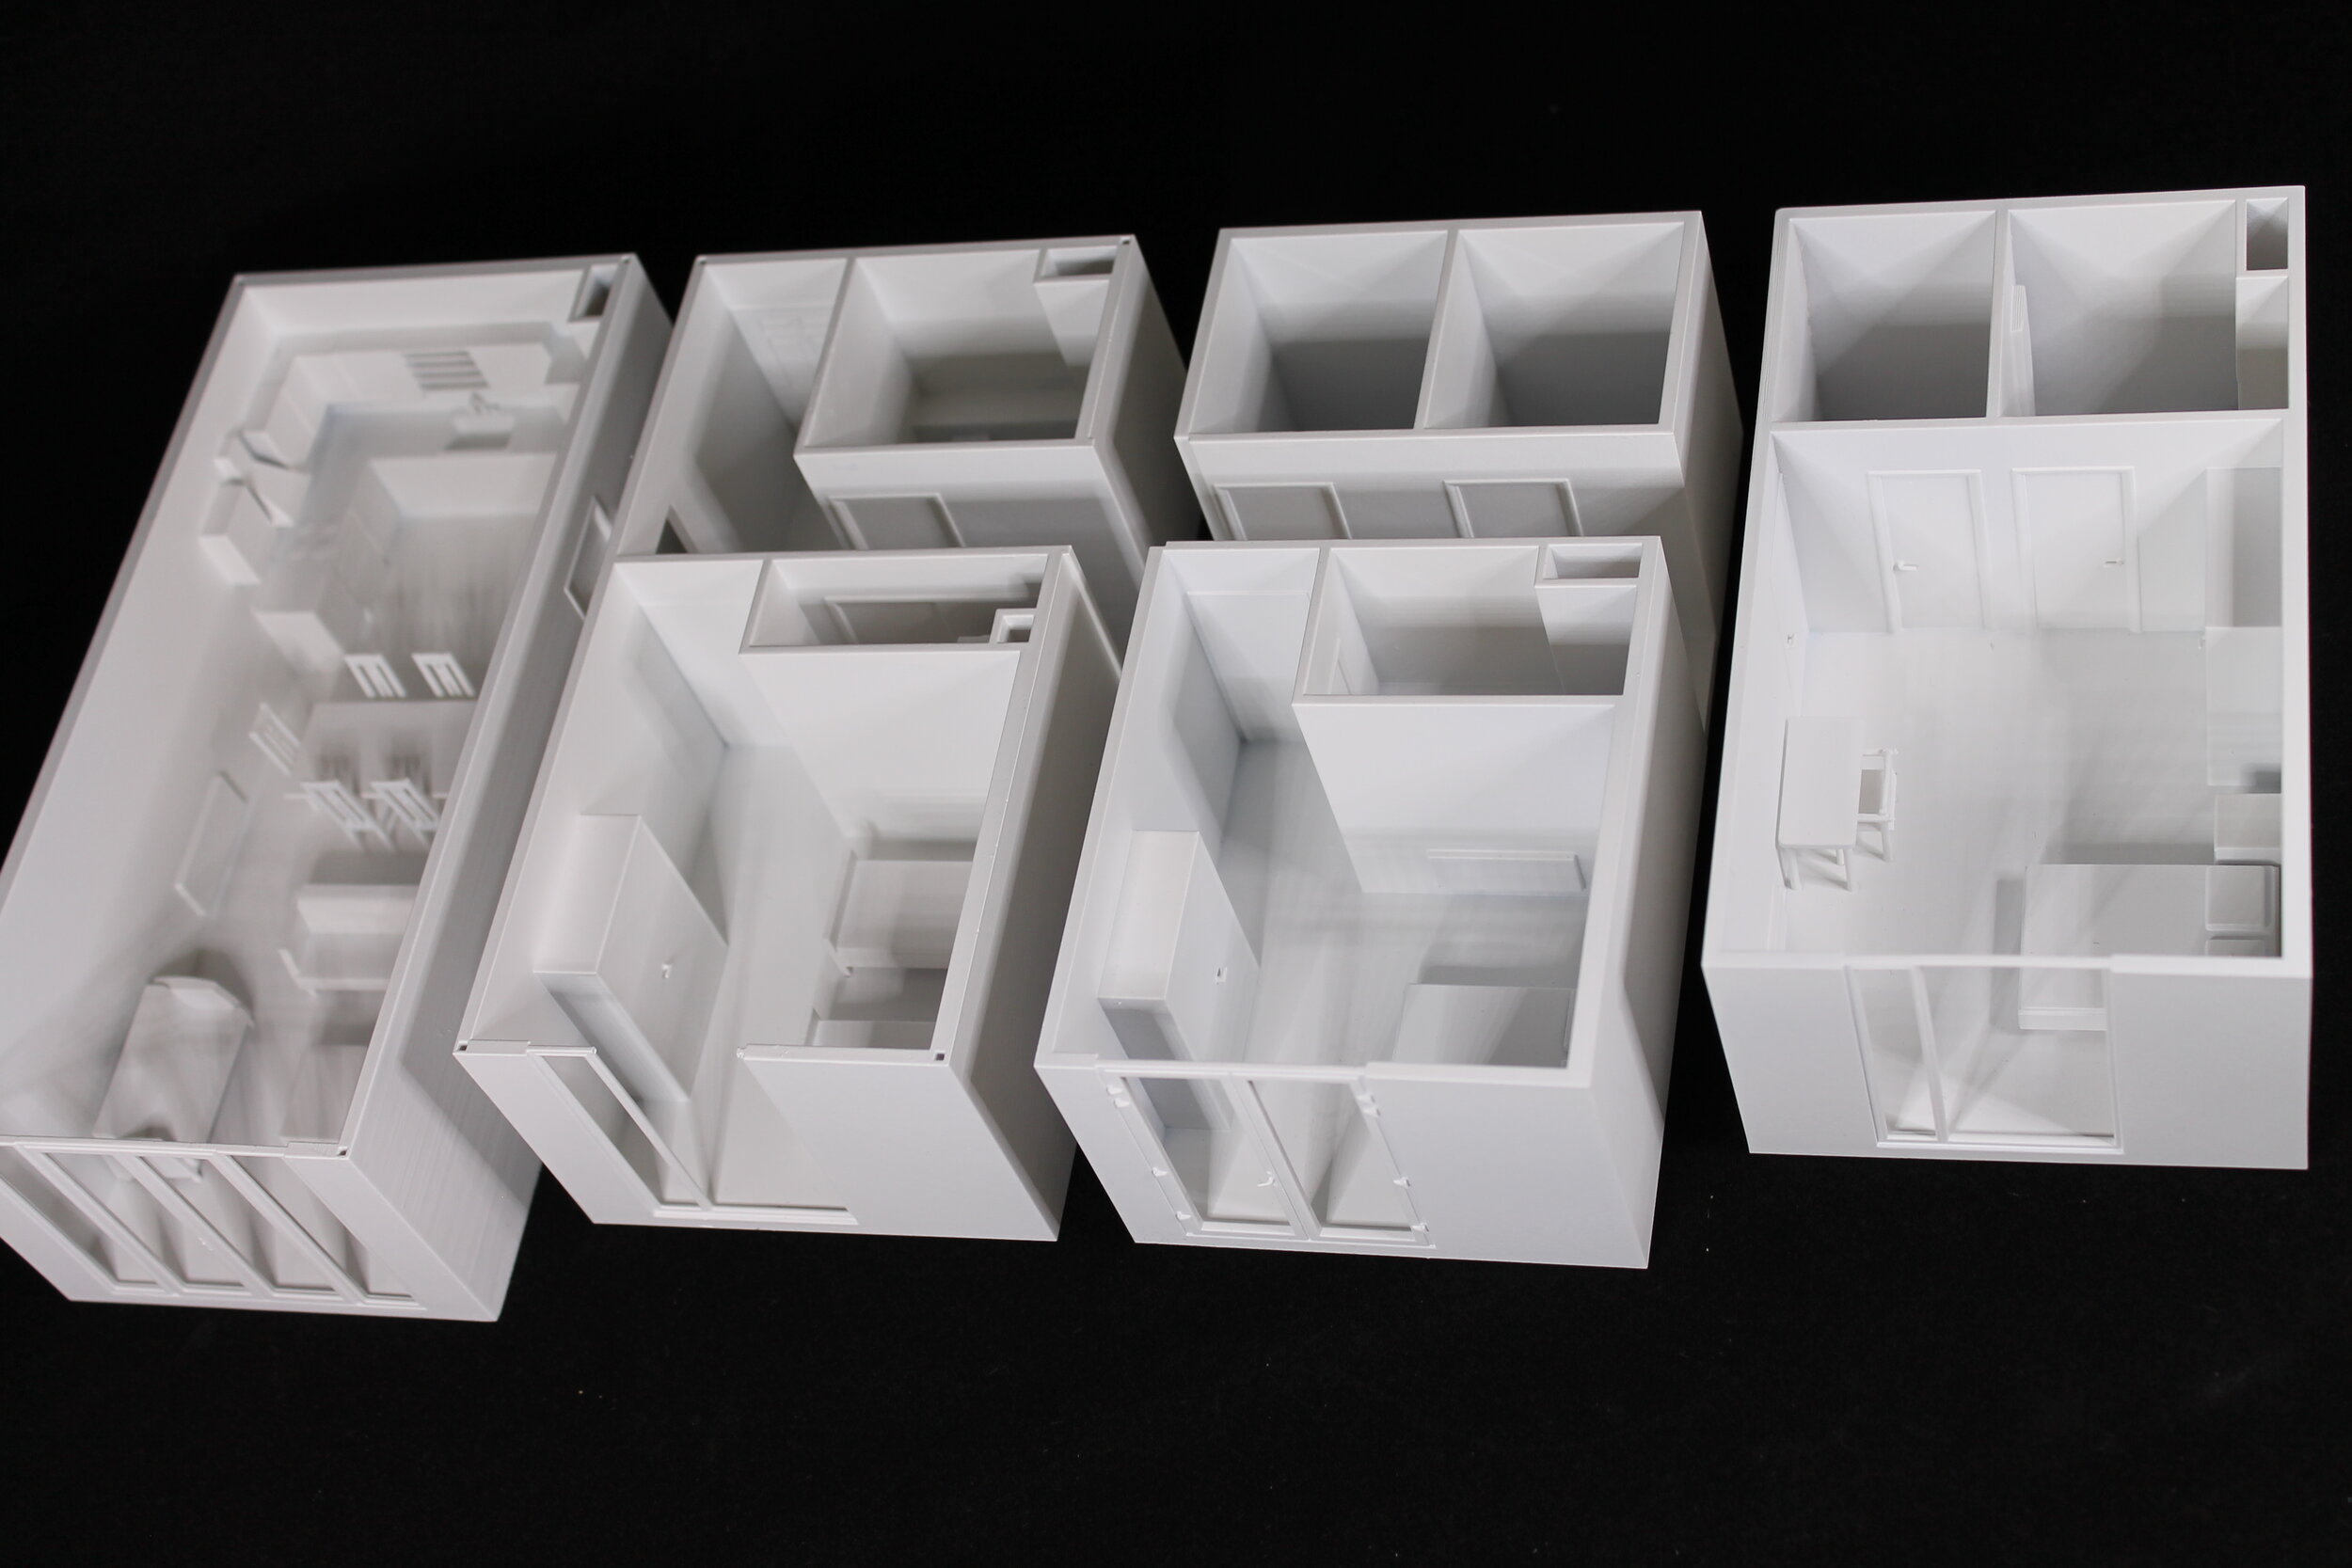
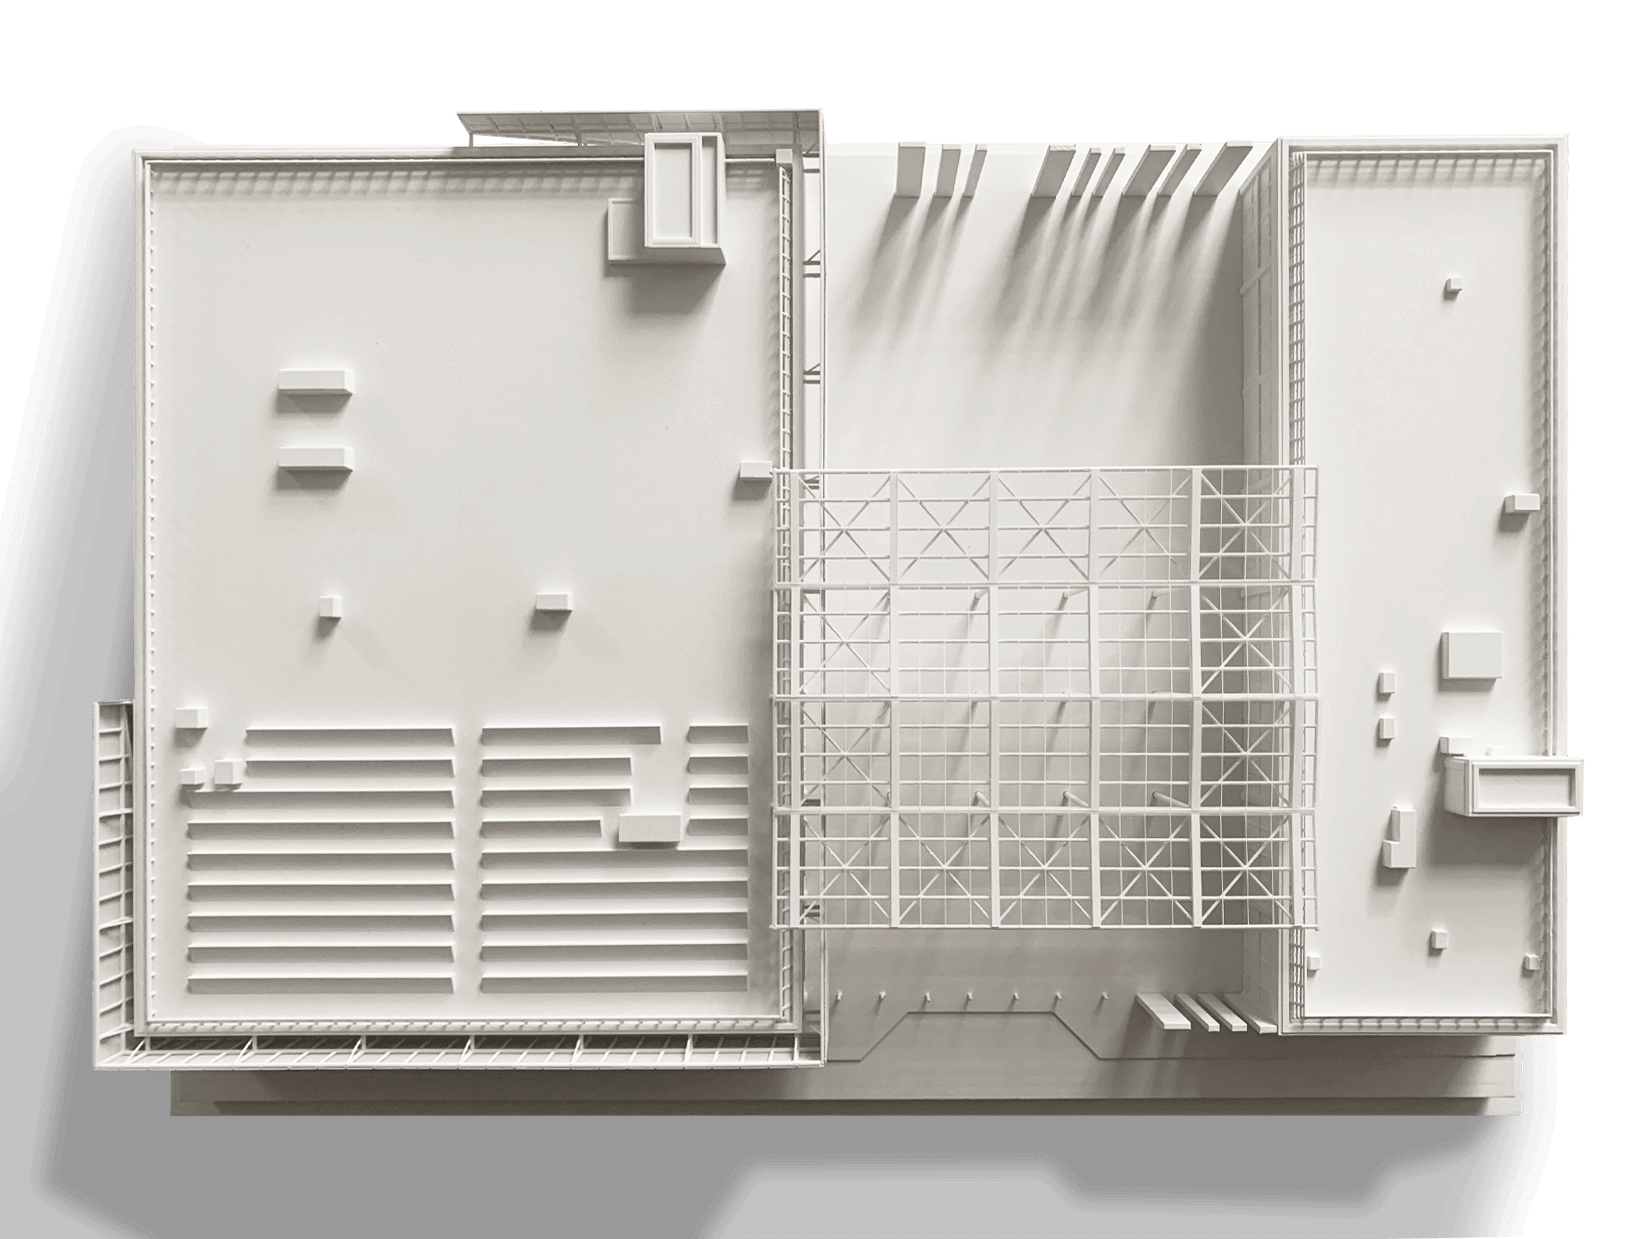
An A3 model @1:100 was chosen as a scale and size that was both affordable and could reflect the necessary detail, whilst also being handy to carry to meetings and set in the centre of the board room table. A clean, monochrome white finish was also determined as the best route to ensure that the model focused on space and detail rather than attempting to represent materiality (which could have also added to time and cost). 

3D Traditional Printing

The digital model for MSU was supplied initially from Revit (in an FBX format, so the first step is to remove additional detail that wasn’t necessary for 3D printing. Each 3D printing project is started by breaking down the model into manageable elements, working back from the finish desired. It’s important to know what 3D printing is capable of and to push the boundaries to ensure the most efficient use of resources for your client/end-user. 

3D Traditional Printing

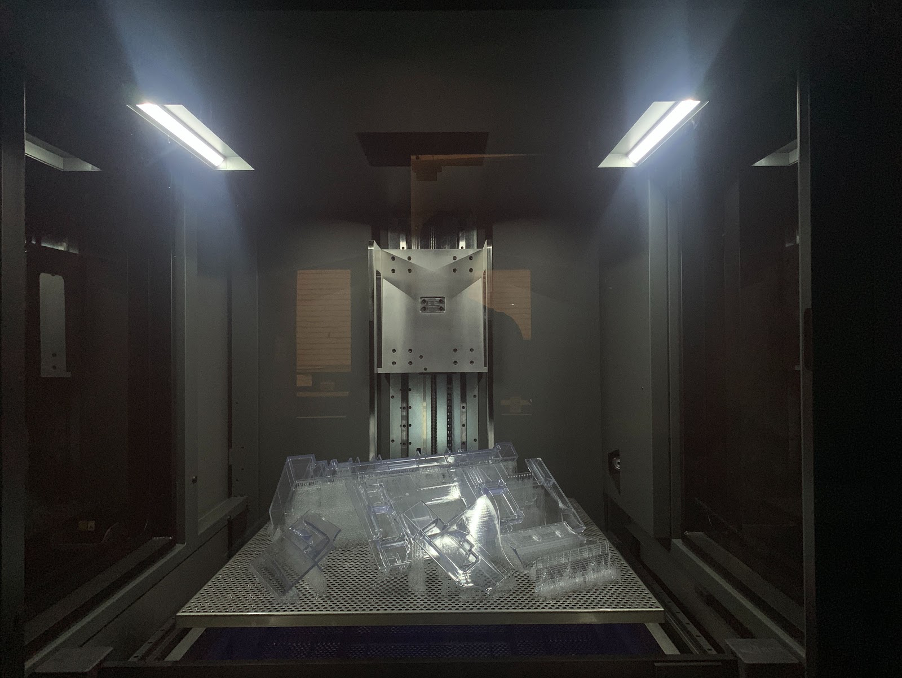
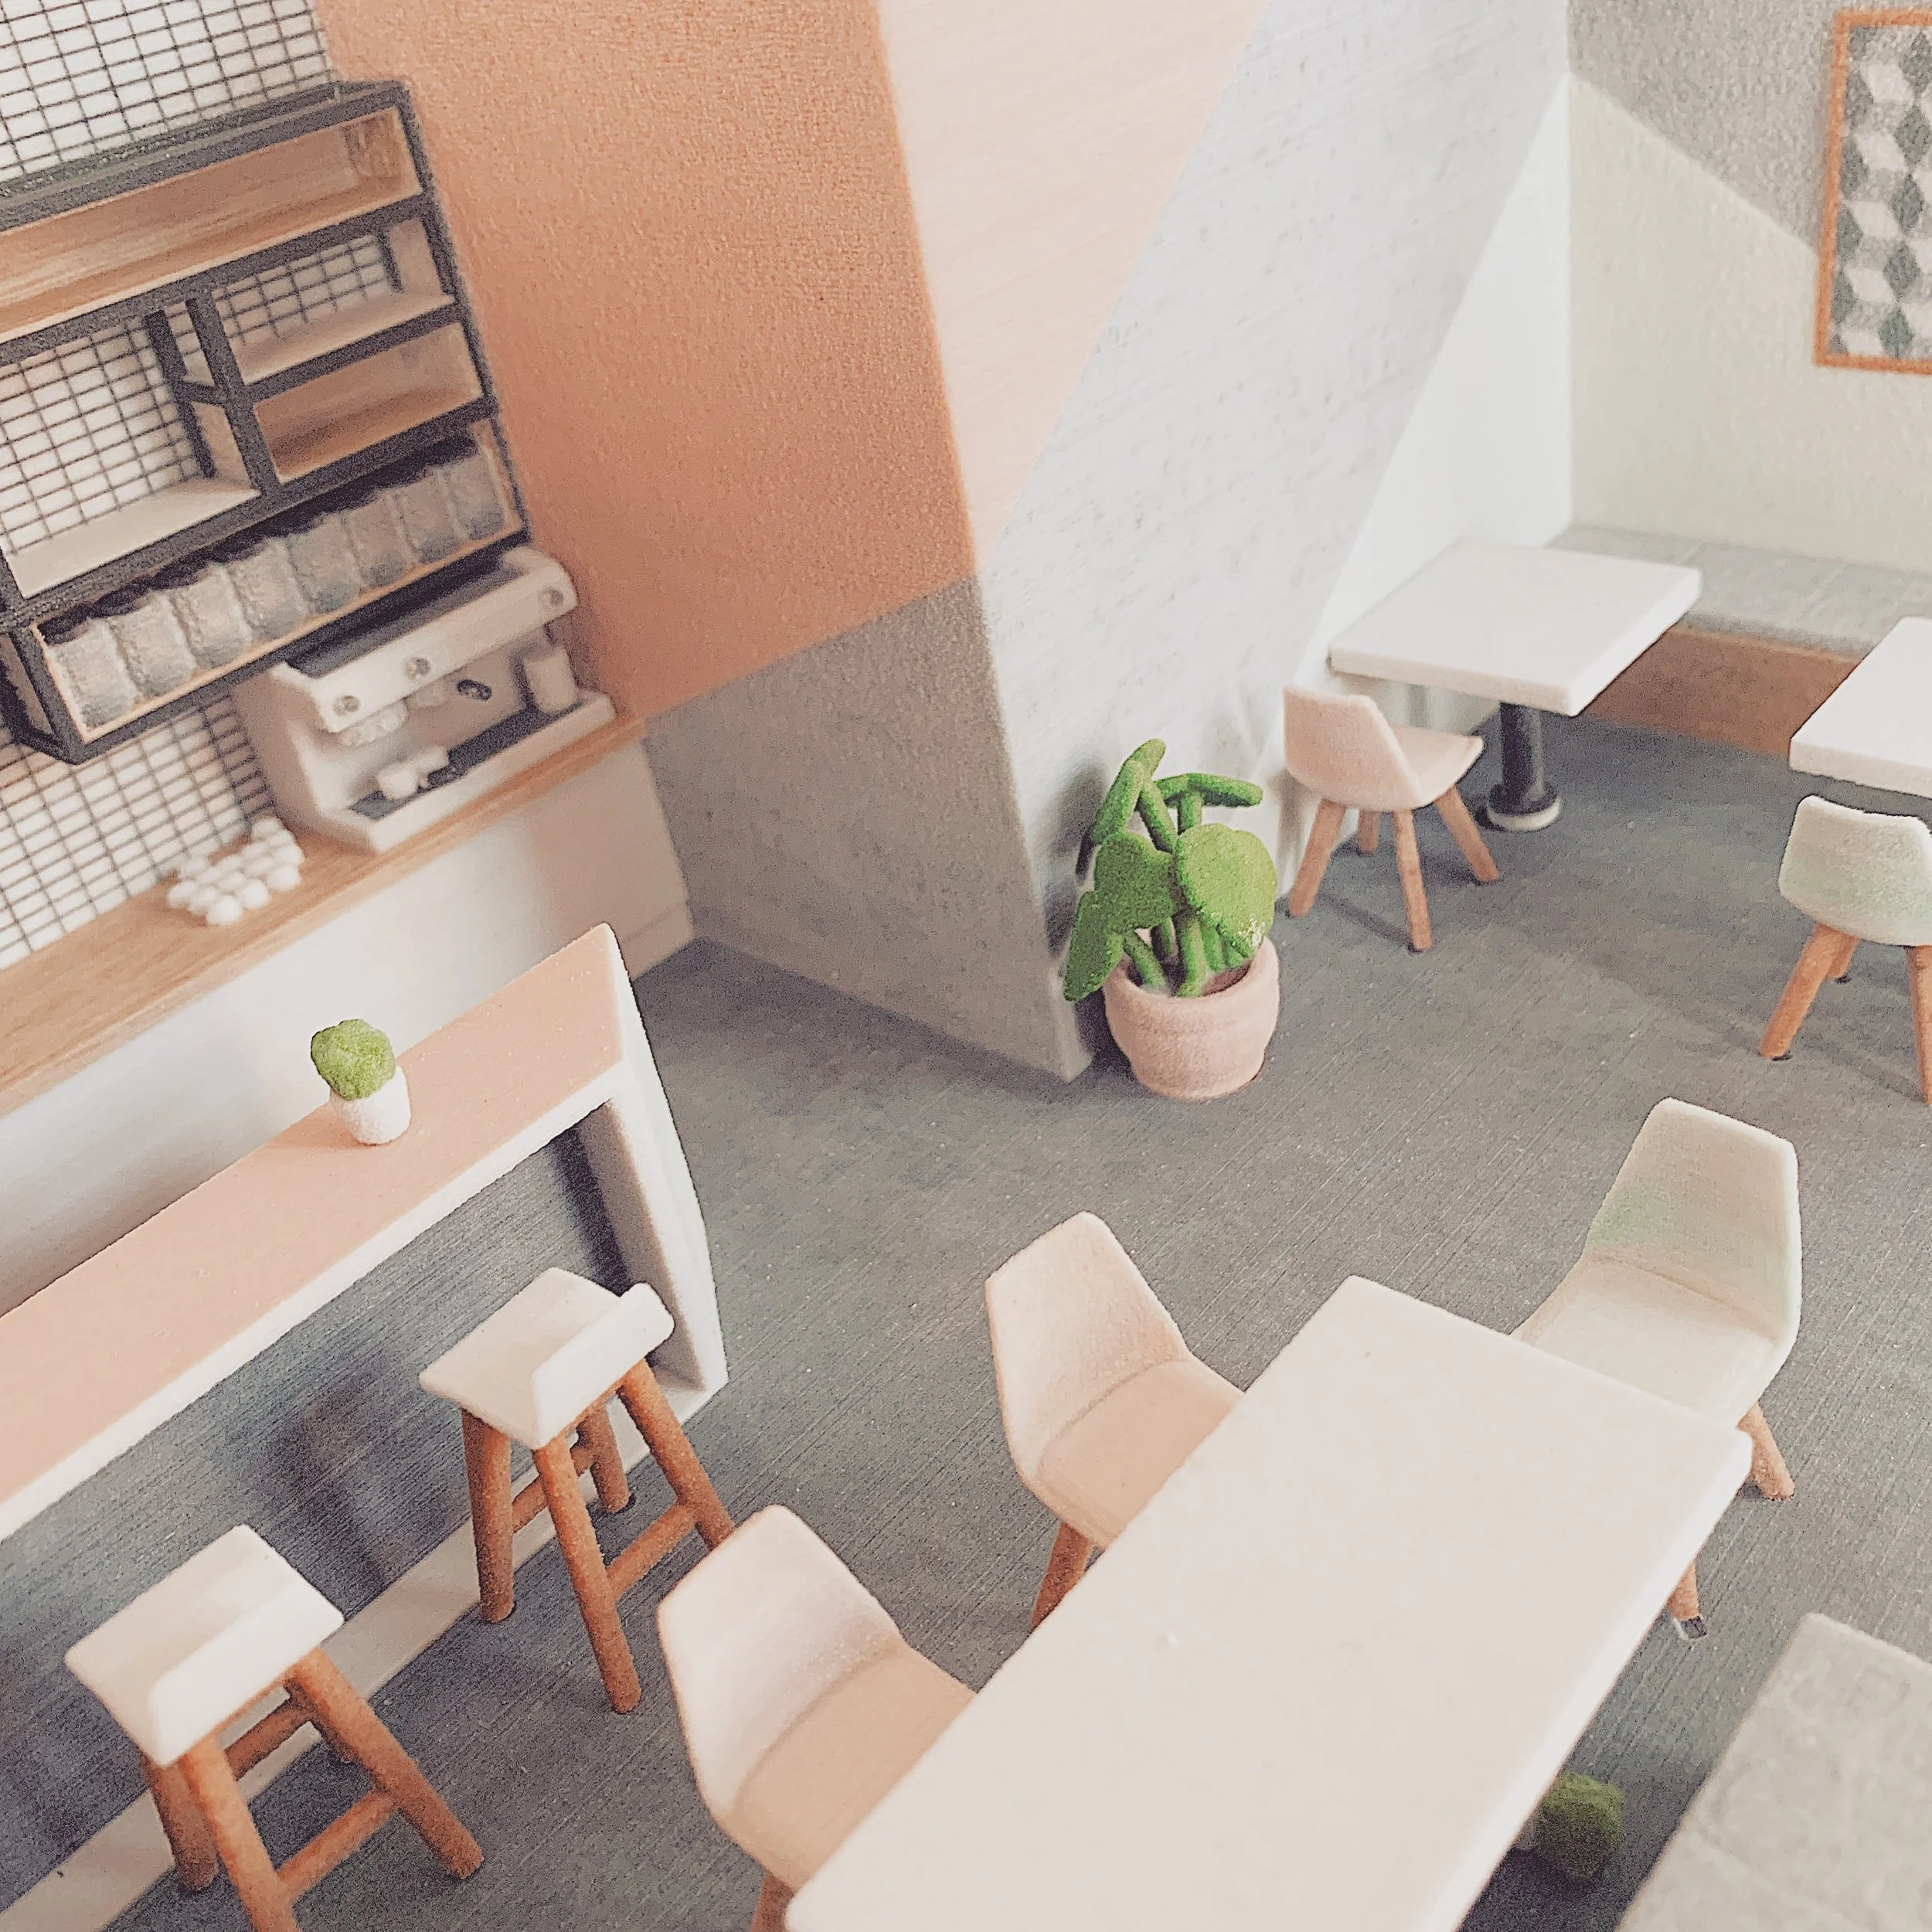
The focus of the model was the glazed pergola structure that connects the two buildings with a covered external space. 

3D Traditional Printing

We knew that the perforated panels would not achieve anywhere close to the desired effect if 3D Printed at this scale (the holes being 0.1mm in diameter). It was therefore decided to have this detail brass etched. 

3D Traditional Printing

The pergola, although delicate, was achievable through 3D printing. However, for the glazed canopy, we reverted to traditional methods again - laser cutting and etching clear acrylic to be placed onto the structure of the 3D printed part. By breaking down the model into its constituent parts it allowed all of these elements to be brought together after being 3D printed, post-processed and spray finished.

3D Traditional Printing

The result is an affordable model that achieves a high level of detail through the best combination of available methods and most importantly clearly communicates key design intentions.

Model Cost: £1,850 + VAT

Turn Around: 10 working days (including model assessment, file preparation, 3D printing, brass etching, spray finishing). 


To see a version of this model being created in real-time watch our Fixie overview created for the AJ100 awards 2020. 

 
Case Study: Modular Apartments
 

3D Printed Modular Construction Units for - Corstorphine Wright O'Brien Architects


When architecture and 3D printing are mentioned in the same sentence, the tendency is to be drawn to the widely shared examples of stand-alone, 3D printed houses. In this context, 3D Printing is frequently listed as a potential solution to worldwide housing shortages: its advantages allowing for quick and affordable alternatives to traditional construction methods. No doubt this work is necessary and will eventually assist in combating major housing crises. However, for developed, high-density urban centres 3D printing at this scale is still a long way off being feasible with any real, wide-scale impact.

3D Printing a House

3D Printing a House

Modular and prefabricated construction is already a viable solution to many of our housing needs and it’s actively being implemented by architects and construction companies. We were therefore excited to be able to use what 3D printing currently does best (prototyping for those who were asking, or ‘model making’ in architect’s language) to help communicate the benefits of modular construction by preparing and printing a selection of Corstorphine Wright + O’Brien’s Modular Apartment Units.

Corstorphine Wright O’Brien is leading by example in the design and implementation of modular building in Ireland. CWO had four different modular units that they wanted to be completed with removable roofs in order to show the internal layouts.  The models would be used in varying combinations during presentations. As material finishes of the units weren’t settled we suggested a simple white sprayed finish on robust, resin printed models. A few challenges emerged from pursuing this option, but the end result led to clean, smooth and detailed parts. 

Modular Apartments

C+W O’Brien’s scaled 3D Printed Modular Units being used in a presentation. Source

Our resin printing process produces semi-transparent parts. To spray all of these parts and get an even finish requires uninhibited access to all of the model. The furniture in these modular units would have blocked the ability to spray evenly, so unlike other printing processes where you might print everything at once, resin printing often requires some ‘model design’ - thinking on how to split up the model, so that it can be post-processed (support removed) and spray finished before being reassembled. 

A completed build of clear resin printed architectural model parts. The support structure that will be removed can also be seen. The build volume of this machine is 800mm x 800mm x 600mm (RPS NEO 800)

A completed build of clear resin printed architectural model parts. The support structure that will be removed can also be seen. The build volume of this machine is 800mm x 800mm x 600mm (RPS NEO 800)

The digital models supplied were of a very high quality (of course!), however, our job at Fixie is to make sure elements survive 3D printing and post-processing, a perfect architectural model (and we’ve seen our fair share of less than perfect files!) is very different to a 3D printable model. This process involves thickening certain features e.g. door and window frames. These kinds of details add to the finished model so there is an element of creative licence to accentuate these beyond their actual size. Model making is after all a representative medium, no matter how much 3D printing allows you to get as close as possible to the real thing. 

Furthermore, we have to make each unit one single shell for 3D printing. Often the model, no matter how well thought through will contain many separate meshes for walls, cupboards, doors etc. It’s our job to merge these seamlessly using our file fixing software. Understanding the client’s design objectives is always a guiding consideration in this process.

The furniture was separated from the rest of the model and ‘booleaned’ from it. This process allows for small location points to be present on the model to accommodate glueing during reassembly.

Windows were removed to be clear voids to allow more aspects into the interior of the model (these could also be glazed in clear acrylic).

The fixed digital models (each part is a single shell)

The fixed digital models (each part is a single shell)

The most technical issue was how to drain uncured resin from the 3D printed parts - all 3D printed parts are hollowed where possible to reduce the material usage. However, this can mean that uncured material is trapped within the model. A simple way to allow this to drain away is to create small holes which can then be plugged or filled before being sprayed to conceal this manual effort. Normally we would hollow parts/buildings from the underside so that you wouldn’t see it at all in the final model, due to the fact that the pieces would be fixed to a base. Or alternatively, the parts are printed solid because they are of a delicate form or size. 

3D Printed Modular Construction

Roof parts and furniture pieces after printing

With these issues addressed, we 3D printed (Overnight), let the uncured resin drain away, removed any supports, washed the parts in isopropanol to remove any surface coatings of resin, cured in our UV oven to make the pieces stronger, bead blasted the parts to give them a perfect finish for spraying (the next morning), filled the resin drain holes, spray finished the parts and then glued furniture back in place (that afternoon). 

Finished 3D Printed Models

Unit cost for production in this manner (File preparation, 3D printing, spray finishing and assembly):  c.£325/€375 each (+VAT and Delivery). 

These models could also be produced in full colour directly in the printing process using our colour jet printing (gypsum powder) and multijet fusion (nylon powder) technologies. Please get in touch to understand more about these options.

 
Fixie secures R&D funding
 

Fixie secured aN Innovate UK grant to deliver automation that makes 3D printing an accessible and affordable tool for all architects.

Press Release: Monday, November 23, 2020.

Fixie, an innovative 3D printing firm, has secured £100,000 in funding from Innovate UK to build an automated online platform that will drastically cut the time it takes for architects to create physical models from their digital 3D designs.

Fixie’s platform simplifies the architectural 3D printing process by eliminating the need for arduous remodelling which can currently take days to convert an architects’ design to a 3D printable version. The company, which focuses on the architectural sector, will be supported by the University of Sheffield Advanced Manufacturing Research Centre (AMRC) on the project.

“We started Fixie to give more architects the opportunity to benefit from rapid prototyping. Our platform means that you don’t need to have any prior knowledge to prepare your design for 3D printing - opening up the technology to those without the niche skills, time and resources.” Ronan O’Boyle, one of the founders said.

Innovate UK, as part of UK Research and Innovation, is investing up to £191 million to fund single and collaborative research and development projects as part of the Sustainable Innovation Fund over the next two years. The aim of these competitions is to help all sectors of the UK rebuild after the effects of COVID-19.

The Sustainable Innovation Fund is funding 1,103 projects, 1189 UK businesses and totalling over £130 million in support across the UK.

Michelle Greeff, Fixie CEO said:

“This grant award recognises the potential social and economic impact of Fixie’s platform at a time when architects are rethinking how cities are used and designed. It’s an endorsement of our vision and the commitment to providing architects with tools to make practical and wider use of emerging technologies.”

The University of Sheffield AMRC is a network of world-leading research and innovation centres that work with manufacturing companies of all sizes around the globe. The organisation, part of the High Value Manufacturing (HVM) Catapult,  transforms industrial and economic performance by making step changes in productivity, increasing competitiveness, developing new products and processes and training new talent and skills.

Head of Digital at the University of Sheffield AMRC, Professor Rab Scott, said: “This is a hugely important project which is at the heart of what the AMRC has built its reputation on: transforming industry through collaborative research.

“Through the application of digital tools, architects will be able to produce digital 3D designs in hours rather than days. The development of this vital platform, increasing speed and cutting costs for the supply chain, will both enhance the sustainability of how businesses deliver for their clients and add value across the construction and built environment sector.”

Innovate UK Executive Chair Dr Ian Campbell said:

“In these difficult times we have seen the best of British business innovation. The pandemic is not just a health emergency but one that impacts society and the economy.”

“Fixie, along with every initiative Innovate UK has supported through this fund, is an important step forward in driving sustainable economic development. Each one is also helping to realise the ambitions of hard-working people.”

About Fixie (www.fixie3d.com)

Fixie – architects’ 3D printing assistant – helps architects communicate their projects through 3D printing.

About AMRC (www.amrc.co.uk)

The University of Sheffield Advanced Manufacturing Research Centre (AMRC) is a world-class centre for research into advanced manufacturing technologies used in the aerospace, automotive, medical and other high-value manufacturing sectors.

The AMRC has a global reputation for helping companies overcome manufacturing problems and is a model for collaborative research involving universities, academics and industry worldwide.

Combining state of the art technologies with the AMRC’s expertise in design and prototyping, machining, casting, welding, additive manufacturing, composites, robotics and automation, digital manufacturing and structural testing, has created a manufacturing resource far beyond anything previously available in the UK.

The AMRC is a member of the High Value Manufacturing (HVM) Catapult, a consortium of leading manufacturing and process research centres, backed by the UK’s innovation agency, Innovate UK.

About Innovate UK (www.innovateuk.ukri.org)

Innovate UK drives productivity and economic growth by supporting businesses to develop and realise the potential of new ideas. 

Innovate UK connects businesses to the partners, customers and investors that can help them turn ideas into commercially successful products and services and business growth, funding business and research collaborations to accelerate innovation and drive business investment into R&D. 

Support is available to businesses across all economic sectors, value chains and UK regions. Innovate UK is part of UK Research and Innovation. 


Contact:

Ronan O’Boyle, Co-founder

Email: ronan@fixie3d.com

Phone: +447427380639

Fixie Website: 

www.fixie3d.com

Fixie Twitter:

https://twitter.com/Fixie3D

Fixie LinkedIn

https://www.linkedin.com/company/fixie-3d

Fixie Instagram:

https://www.instagram.com/fixie3d/


Housing Study #1: Golden Lane Estate (1957)
 

Fixie’s #3DPHousingStudy explores at least one influential UK housing project from each decade starting with the City of London’s 1950’s development at Golden Lane Estate (location) designed by Chamberlin, Powell and Bon

Great Arthur’s House, Golden Lane Estate (c) Steve Cadman

3D Printed Model of Great Arthur’s House by Fixie.

We are focusing on the elements that made these projects special as well as how 3D printing can be used so effectively to bring those details to life. These projects have been precedents for the housing designs of generations since and yet there has been next to no investigation of them through emerging technologies like 3D printing. Would they have been designed differently if seen through the eyes of these technologies and materials? Can we understand the spaces or the approaches in a new light through the lens of 3D Printing? 

Each project will be at 1:100 scale 3D printed in resin and spray finished white to maintain a consistency for ease of comparison between projects. We’re excited about what will emerge.

Great Arthur’s House, Roof Plan View of 3D printed Model.

Great Arthur’s House, Roof Plan View of 3D printed Model.

Housing Study #1 is focused on the communal and sculptural resident’s space at the top of Golden Lane Estate’s highest block; a 16 storey residential tower called Great Arthur House. As was a feature in post-war residential tower blocks, generous and integrated spaces like this were offered to residents of this new archetype. The rooftop’s most striking feature is its ‘Hat’ a curved and cantilevering concrete form that disguises a water storage tank. It is elegantly folded on top of the tower, like a piece of origami in direct contrast to the rectilinear tower that supports it.

Some beautiful details of this like the above, curated by Wayne Head, can be seen here: http://theeverydaypress.net/details-vol-2-barbican-and-golden-lane.

Some beautiful details of this like the above, curated by Wayne Head, can be seen here: http://theeverydaypress.net/details-vol-2-barbican-and-golden-lane.

As well as the functional purpose it was hiding it also offered a gift to residents: a 17-storey 360 degree view of the Capital City. Nowadays, especially in a City like London, a space or experience like this comes with a lot of prestige, often a price tag and is generally only accessible to the few. In contrast, San Francisco, a city that is well known for its wealth divide, ensured spaces like these were actually of practical benefit to the general public. The 1985 Privately Owned Public Open Spaces (POPOS) legislation obliges new developments to provide 1sq. ft. of public space for every 50 sq. ft. of office space but perhaps more importantly in 2012 the law was updated to ensure the public knew where and how to access these spaces; so they’re now clearly sign posted. In an increasingly more vertical city like London, accessibility of these spaces becomes more of a necessity (balanced against security concerns and of course more recently social distancing concerns). 

Golden Lane Estate

The seperated digital Model parts prior to 3D printing.

When creating the 3D print of this model our 3D file fixers separated the digital information into 3 separate parts (The hat, the pergola and the tower block) for improving the post processing and finishing stages. Of course, 3D printing can print all in one piece (depending on print volume size) but often it makes sense to deconstruct a model like this in order to achieve the best results. 

Resin printing has an ability to bring out crisp and fine detail. This was especially useful when printing the expressive curved form of the tower’s ‘Hat’ and the delicate pergola. It almost felt like such a generous sculptural form deserved to be printed in such a clean and smooth format. Often 3D printing is the go-to tool for truly complex forms because it becomes very difficult to make them by hand or comprehend them through visuals/renders. However, it’s interesting to note that although it’s an unusual form, it is clearly of it’s time - almost an extrusion of a 2D drawing or section rather than a computer generated/informed design. If Chamberlin Powell & Bon had the tools available to us now it makes you wonder if they would have pushed this form further. This may very well have been to its detriment: the simplicity in many ways makes the form easier to digest.

Detail of Roof Top Garden, Great Arthur's House, Golden Lane Estate by Fixie 3D

Great Arthur’s Tower was sensitively re-clad in a project by John Robertson Architects. “The new facade improves the performance of the original windows with a double glazed and thermally insulated prefabricated panel system. The project involved extensive consultation with the City Planners, 20th Century Society and Leaseholders and tenants and received an RIBA National Award in 2019.”

Situated just North of London’s iconic Barbican Estate, Golden Lane Estate has, unlike many that were designed, built and demolished in the meantime, has continued to accommodate community life and doing this in the heart of the UK’s biggest city where Real Estate is at a premium. This is probably no surprise considering that the residents were so actively and overtly considered in the original design. 

Contributed by
Ronan O’Boyle,
Co-Founder, Fixie.

 
Model Making and 3D Printing Survey

Fixie have launched a model making survey in their efforts to understand the appetite for models in the contemporary design process. Central to their study is where 3D printing fits within current processes.

SURVEY

The 2-minute survey is open to anybody within the industry who has an opinion! We’re sure that makes a few of you. Fixie are offering a draw for £5,000 of 3D printing services and separately a Chisel and Mouse Model to those who submit and wish to enter our draw.

We’ll be sharing our insights gained with the industry once all results are assessed.

If you have any further comments that aren’t covered by the survey and would like to share your thoughts please get in touch directly.

Thank you for your contributions.

Michelle Greeff and Fixie Team.

A Return to 'Happy Mistakes'
 

How 3D printing can influence

the architectural design process

Issue 309, February 2020, P. 102-103

Architecture Ireland Article - link

Many architects will have a complicated relationship with making models. Fond memories of simpler times quickly give way to what were actually coffee-fuelled, red-eyed, all-night marathons where fingers could be both glued together and covered in scalpel cuts in equal measure.

However, the relationship between the act of physically making and the design process formed a key part of our education in helping us to understand space and scale. Dr Simona Valeriani, who is leading an international research network on ‘Architectural Models in context: creativity, skill and spectacle’, highlights the critical relevance of models to the design process as ‘tools for thought and communication’. She says that they help us ‘to make invisible design processes visible’ and to document ‘moments of communication that are otherwise ephemeral’. According to Dr Valeriani, unlike any other media, models ‘directly convey the embodied 3D qualities of a building and have, since the Renaissance, been seen as the most comprehensible form of architectural representation’.

However, this pivotal role in the design process hasn’t prevented many of us laying down our scalpels and repurposing our cutting mats as mouse pads in recent years. This has been less a defiant downing of tools but rather a laying down of arms – a surrender representative of the wider shift from physical, hands-on skills to digital competencies. Emerging graduates and young architects are no longer tasked with making concept and competition models. Their literacy in quick and accurate computer modelling, along with creating effective visuals, allows for the leapfrogging of a traditional pillar of the architectural design process.

What we lose from this digital allegiance are the venerated ‘happy mistakes’ that might arise in exploring a design through model making.

This shift in skillsets is only one of a range of contributing factors that explains an increasing emphasis on visuals rather than physical models. The comparative ease of delivering CGIs and animations, along with the fact that visual images can be more justifiably charged to clients (both because of their efficiency and defined value) creates a case for residing within a digital bubble. Furthermore, visuals require little explanation. Whereas models allow viewers to read between the lines, visuals immediately speak the client’s language. It’s clear the choice comes down to ease and simplicity; presenting visuals to communicate design is more in tune with current workflows. What we lose from this digital allegiance are the venerated ‘happy mistakes’ that might arise in exploring a design through model making.

Such a move from manual/2D workflows to digital/3D methods does not mean that we need to sacrifice architectural models entirely though. 3D printing technologies allow us to take advantage of these new workflows in producing quick, affordable, and highly detailed representations of our digital designs. Critically, we can now make 3D models directly from 3D design data, as opposed to traditional model-making methods which require a return to 2D drawings to then produce a 3D model.

Prototyping through 3D printed models for Corstorphine + Wright Architects

Prototyping through 3D printed models for Corstorphine + Wright Architects

3D printing is probably better known in its role as a prototyping tool, rather than as an approach to architectural model making. However, model making is undeniably a prototyping exercise, we’re just used to softer terminology for it. If we can begin to alter our perception of 3D printing in the architectural domain to begin to actively experiment with this new medium, both as a presentation method but more importantly, as an iterative design tool, it could present new ways to think about structure, form, and the construction process. We can begin to expose new ‘happy mistakes’.

In direct comparison with traditional model making methods, 3D printing technologies offer a range of new materials with varying qualities: transparent v. opaque, flexible v. rigid, smooth v. coarse and layered, full colour v. monochrome. Much like traditional model making, the choice of one or a combination of many helps to reflect the desired design; with the aid of technology though, many more options and varieties can be tried and tested prior to making a final design decision.

3D Printed Organic Forms in various finishes.

3D Printed Organic Forms in various finishes.

3D printing has the advantage of creating organic shapes and delicate structures with ease. However, it also has its own constraints, which are individual to each technology. Each constraint will influence your model design choices and consequently the overall design, whether that be the size of the printing bed, the strength of the material, detail achievable, appearance, or the post-processing methodologies.

On a practical level, for example, only being able to 3D print a facade element at an oversized thickness might affect your resulting detail, while the monolithic aesthetic of some materials and processes might lead you down the path of more massive structures. On the more theoretical side, the ability to easily create elaborate, complex, organic physical forms has the potential to test and experiment with solutions that would previously have been difficult to make or even imagine.                

To illustrate the influence of 3D printing on how architects might think and make, some examples which actively utilise these processes are discussed below. Critically, cases involve both the prototype scale and 1:1 built forms.

Make is a different kind of architecture practice. The employee-owned firm aims to "design the best buildings, places, and spaces in the world". Make's Ultim...

Make Architects, headquartered in London are – somewhat evidently from their name – focused on design through making. While they are encouraged to work with their hands, they have also invested in a bank of twelve Ultimaker ‘desktop’ 3D printers which allow for continuous 24/7 design development. It’s an approach that saw them shortlisted in the Best Use of Technology category in the AJ100 Awards (You may recognise the 2019 version of these awards)

We set up Fixie, the architectural 3D printing specialist with a similar aim to help build up a greater knowledge base of 3D printing within the architectural ecosystem. By making ourselves available as the ‘architect's 3D printing assistant', we hope to inform architects of the benefits and constraints of this technology. We know that architects are thinly spread and 3D printing can be a daunting additional task to approach; our aim is to make complex digital designs 3D printable. This involves a process called ‘file fixing’, where model files are edited to ensure that they print in the specified technology, with the desired detail, and that they survive any post-processing and finishing tasks. Architect's files need this special treatment as they're predominantly works-in-progress, not the finished articles that 3D printers normally encounter.

Until now, this article has discussed 3D printing solely with respect to the production of replicas and scaled working models. However, there are already numerous organisations who are thinking bigger; thinking about how 3D printing can offer an alternative to current methods of construction – allowing for decentralised, disaggregated, and more sustainable production methods.

Find out more about Ai Build's large scale 3D-printing technology at www.ai-build.com

AI Build emerged out of Zaha Hadid Architects. They have developed large-format robotic 3D printers that can create intricate parametrically modelled forms (akin to Zaha Hadid’s designs). These printers can create usable furniture and sculptures modelled in such a way that the structure is self supporting. Because of this integral strength, multiple parts can also be pieced together to create elaborate, expansive forms – 3D printing being a potential catalyst for more organic and efficient structures.

3D printed facade elements designed by DUS Studio for the Dutch Embassy Building.

3D printed facade elements designed by DUS Studio for the Dutch Embassy Building.

DUS Architects, based in the Netherlands, have also created their own 3D printer – XL 3D Printer – in collaboration with Ultimaker. They’re using this 3D printer to create 1:1 building elements, including facade details, benches, and even a micro-home. Using 3D-printed elements, in combination with traditional building materials, they’re creating practical design solutions.

Aectual has emerged from DUS to pursue this avenue of thinking; they’ve turned the approach on its head by, among other things, using 3D printing to create formwork for more experimental concrete structures. Here, 3D printing is offering a way to reinvent existing materials.

XL 3D Printer used by Aectual to 3D print the floor of Schipol airport

XL 3D Printer used by Aectual to 3D print the floor of Schipol airport

However, you don’t have to be changing an entire industry with your explorations into 3D printing; architects can benefit through quietly and quickly exploring facade detail options or massing proposals without the fear of scalpel blades. Although it is an engineered response to a traditional task, 3D printing is open to exploration, to pushing rules and boundaries, and to leading you on an unexpected journey.

 
Fáilte go Fixie - Fixie launches in Ireland
 

The regular trips across the Irish Sea over the last few months have paid off. No, we’re not running because of Brexit - we’re growing in spite of it! Fixie is now –in an extremely timely fashion– both a UK company and a European company, more specifically an Irish one. 

Fixie Co-Founder, Ronan O’Boyle has been relishing the opportunity to work from Ireland again. ‘It’s been a number of years since I’ve been properly on the ground in Dublin, there’s a tremendous buzz and we’ve had such a positive reception for what we’re offering.’  

Fixie has plans beyond it’s day-to-day offering (for those wondering: fast turn around, beautifully detailed and affordable architectural models delivered through a combination of 3D printing and traditional methods). We’re excited to explore and contribute to ongoing initiatives in Ireland in an effort to improve the communication of built environment issues and the delivery of quality solutions. Ireland is suffering from a housing emergency and communicating possible solutions effectively to all stakeholders will be a first step to solving some of these issues. 

Fixie’s Irish operations will be centred in Dublin’s ever changing Docklands with an encouraging Start-Up ecosystem at Dogpatch Labs. To celebrate our new location guess what we did - we 3D printed one of the local landmarks of course: Dublin’s Samuel Beckett Bridge designed by Santiago Calatrava that opened in 2009. We’ll be happy to see the real thing every day on the way to work.

Michelle Greeff, Fixie CEO, has been encouraged by her interactions in Ireland. ‘The Irish economy seems to have recovered well and the construction sector is alive here. What I’ve found remarkably refreshing here is how open and engaged architects are in our new ways and new possibilities of delivering architectural models.’ Michelle believes that our experience working with all scale of architectural and property development firms in the UK will assist in meeting the varied and particular needs of Irish clients. ‘Our expertise in preparing all manner of architectural files should offer Irish architects a new means to communicate their projects.’

Although our Irish home will be in Dublin, we will be serving the whole country and visiting the other major cities over the coming months and looking forward to meeting existing clients and new on these trips in person. 

If you want to learn more about our services and 3D printing solutions please reach out to Ronan at info@fixie3d.com or call the Irish office on +353 1 960 9604.

 
Preparing for 3D Print - An Architect’s Guide
 

“Let's talk about fixing, for 3D.

Let's talk about your file, and see.

Let's talk about all the good things and the bad things, that may be.

Let’s talk about…”

Inspired by Salt N Pepa

We most likely have your attention now, which is important because the scintillating subject of architectural file preparation for 3D printing awaits you; a few simple steps that will save you from many a restless night (‘Did I really turn off all the layers?’). If you follow this procedure closely then 3D printing will be as much a compliment to your design process as Salt was to Pepa.


Whatever the design stage or the audience, a model is a powerful decision-making tool: offering the ability to see your design in the real world; to touch it; interrogate it and compare it. Unfortunately understanding what is possible, within the timeframe and especially within the budget is not always black and white. To provide you with these answers we need to be supplied with relevant design information and your preferences for how your design should be communicated.

Providing Information for an accurate Quotation

This won’t be the last time we mention this, but we have built a web-based tool for exactly this purpose.

3d Architects

1_HOUSEKEEPING

First things first, it’s important to be organised to help avoid any confusion with ongoing design work, so save a copy of your design file.

a_Create a New Folder:

e.g. “Fixie Quote”

“Fixie 3D Printing Quote”

“I Heart Fixie”

In this folder save a packaged file of your model here. This will ensure that all referenced drawings that are relevant for a quotation are also included in the information that you send to us. 

I love Fixie 3D

b_Name the file appropriately:

Naming the file for quotation differently will always help to avoid confusion.

e.g drawingname_fixiequote.extension

2_Taking out the TRASH: File Clean-Up

Now it’s time to clean up this new file - all of these steps will help speed up the quotation process and, later on, the fixing process itself. It will also ensure that no unwanted information is printed or equally that no time is wasted working on elements which aren’t important.

We all know what makes a file heavy, even if we try to turn a blind eye to the beautiful million polygon trees we’ve imported for “atmosphere”. Let’s run through some of these items:

a_people

No

b_furniture

No again

c_toilets

Noooooooo

d_Sculptural artwork you’ve downloaded from 3D warehouse

😐

NO

In general, the message here is to think about the relevance of the information provided to achieving the final print. If you have a tight deadline, then the sooner we can assess the file and get fixing, the more likely that deadline will be met. A lighter file allows this to happen, so turn off, or preferably delete, those unwanted layers and detail (sometimes non visible/turned off layers will still be imported into our software).


e_trees

Not unlike the superfluous details above; trees can really slow down files and more often than not they’re actually 2D components and therefore will not print. Depending on whether you want trees included in your model or not, the following approaches apply:

Trees Fixie 3D

3D Printed Trees: Supply trees in the model (up to 1-1000)

Traditional Trees (added by hand): Do not supply trees in the model - a separate tree plan will suffice.

No Trees: Do not supply trees in the model


f_context

It’s pretty amazing that we now have entire cities modelled in 3D. A lot of time can be wasted zooming in and out on a Friday afternoon whilst trying to look busy. However, we don’t need all of London to be uploaded for you to get a cost for your 3D print. And don’t worry we’re still very impressed with the size of your data.

Any and all context data that is not going to appear in the print should be removed or it will add time to delivering at each milestone.

3_SIZING IT UP

Scaling your design to the size it will be replicated at is a useful method for understanding how much time to concentrate on any particular detail. We all get bogged down in making things perfect, but if you realise that the element you’re painstakingly correcting is .1mm when reproduced then you may feel less obliged to put that strain on your eyes.

The first thing we do when fixing a file is to ensure we understand the level of detail we’re looking to print at - this starts with confirming the right scale and size which you can do directly in the viewer.

Scale.png


4_SETTING BOUNDARIES

If the steps above have been followed, then we should be dealing with a clean and easy to assess file. Some key questions remain - what are the extents to the model and if you have a site plug, what is the boundary to this?

The best way to communicate this to us is, coincidentally enough, in 3D - if you draw a box or volume covering the area of the intended print and any plugs, then our software will easily be able to interpret this, we will be able to quickly cut to size without any chance that we’ve missed a key landmark or cut off a relevant adjoining building.

Site Boundary.png

5_PACKING IT UP

Our clients work across all CAD software. Our preference remains the same with each, that we are supplied with one or both of the following file formats:

.OBJ (wavefront)

.FBX (Motion Builder)

.SKP (SketchUp)

Receiving multiple formats is ideal as exports of complicated designs can lead to temperamental outputs. It also allows us to compare these file types if something looks amiss in one, removing the need for multiple emails.

(even though .STL is the recognised 3D printing file format, exporting from your native CAD software to .STL will often not be possible if you haven’t built the model with 3D print in mind - more on how to model for 3D Print)

6_Sending IT ON Its Way

Since you have already saved a new file all you need to do is resave/export the file and upload it to our online platform.

3d Architects

The use of messenger pigeons is not advised.

7_WAITING WITH BAITED BREATH


After you’ve specified your project details within our web-app and placed your order, we’ll confirm receipt and approval of the project. If your run into any trouble during the process reach out to us with the in-app chat.

As always, any other questions can we’re here to help.

 
Fixing Series: Error No.3 - Reversed Normals
 

“But mostly I hate the way I don't hate you,
Not even close, not even a little bit, not even at all”

Ten Things I Hate About You

When first hearing the term ‘reversed’ or ‘inverted’ normals you’d be forgiven for having flashbacks to your early teenage years when you were unceremoniously divided by your peers into two distinct categories: normal and not-normal (also commonly known as a weird-o).

Weird "o"

It’s hard to imagine the ignominy that would have come with being labelled a ‘reversed normal’ during these formative years - some part of you is normal, you were so very close, but then you had to go and mess it all up. Typical.

As this fixing series progresses, it seems like each error we encounter exudes a similar stereotype, as if they could be defined by who they hung around with in High School. You remember the movies - there were the Jocks, the Cheerleaders, the Nerds (with many subcategories), Goths, Stoners, Hicks, Creepily Mature Students, Anarchists…the list goes on.

So far we’ve encountered the Bad Edges, who are to be avoided at all costs; the Holes, whose vacuous presence contributes as much to proceedings as the Stoners and now we have the Reversed Normals who elicit images of a student forced to face the corner of a room with a dunce cap on.

Fixie 3d printing inverted normals graphic

Obviously, we need to be a little more sensitive in our treatment of reversed normals these days. After all, they’re just faces looking in the wrong direction. Most softwares will give you the opportunity to highlight the direction of faces/normals. However, rather than making a show out of them, or out of yourself for your hasty modelling, they just need to be given a little nudge in the right direction. It’s imperative that all normals be facing the right direction so that the 3D printing software recognises the areas that are internal, between two external edges and thus communicating a solid printable volume (remind yourself of some of the guiding principles of 3D printing).

If Ten Things I Hate About You taught us anything (and it most certainly did), it would be that first impressions do us no favours. With a little bit of patience, encouragement and self-reflection, any file can be made printable.

So, even after the mess you arrived in and our initial opinion of you, we need to own up to the fact that this was a superficial appraisal. We do not in fact hate you. Now we see you. We see the 3D print you could be. We don’t even hate you a little bit, not even at all.

*Annnd cue: slow clap*

giphy.gif
 
Making of the AJ100 2019 Awards Trophies
 

When Fixie gets invited to dinner we like to leave a good impression. This doesn’t mean grabbing a £5 bottle of wine from our local Aldi... you know who you’re! With the AJ100 Annual Awards ceremony approaching, we thought it would be a fantastic opportunity to leave something with our fellow guests to remember us by.

Our starting point was the undeniably recognisable AJ100 logo and a simple premise: how can we generate a 3D version that would make the best use of 3D printing technologies. We have to admit, things got a bit out of control there for a time (respective exhibits below), but we reeled it in and got back to basics to come up with an elegant, yet unapologetically 3D, version of the logo.

AJ100 Housing - 3D model by fixie3d (@fixie3d)

Once the design had been settled we broke it down into separate parts. This is necessary to ensure that any uncured resin and support structures can be removed after the SLA printing process. This was also useful for our colleagues at Kandor Modelmakers to be able to spray finish the parts to match the distinctive colours of Architect’s Journal.

The SLA printing process can be a mesmerising thing. It’s somewhat like watching a fire in the depths of Winter; your mind seeks out patterns in the chaos. When you know what the design is, it can be even more tantalising as you spot flashes of what it could be...When the parts are finished, they ceremoniously rise from the depths of the resin to gracious applause from the onlooking crowd. At least this is how we like to honour the occasion.

AJ100 Awards SLA Resin 3D printed Trophies on Steriolithography Printer.

The parts are then cleaned up and bead blasted to give them a nice smooth surface. SLA resin printing does not produce colour parts, depending on the resin parts are either semi-transparent or monochrome. Therefore, we need to rely on trusted traditional finishing techniques to make details of models pop (although, not unsurprisingly, architects often prefer the clean minimalism of a single colour model).

White Spray finished SLA Resin 3D printed AJ 100 Awards Trophies

Of course, now would be the time to show you the final result; the fruits of our labour. But with the event not until next week, we wouldn’t want to disrupt the grand unveiling. We hope that all the worthy winners will appreciate the journey these trophies have taken. It would put a big smile on our faces to see them in pride of place the next time we visit your offices!

 
Fixie and Soluis: a match made in virtual heaven
 

At Fixie, we often feel like we’re straddling a thin line between the digital and the physical; walking a delicate tightrope between the virtual and real worlds.

To the newcomer, the ability to conjure physical forms from ones and zeros might appear like an act of wizardry: we take plans, sketches, concepts and designs and make them come alive so that they exist as something you can touch, pick up and interrogate and without an ‘Expecto Patronum’ or ‘Wingardium Leviosa’ in sight.


Even to those seasoned in 3D printing, there are days when you have to step back and remind yourself how remarkable this is: if you can think it up,  you can 3D print it and make it real (We’ve heard that making real buildings is just as magical an experience).


With all of the benefits that scaled models provide for our comprehension of a space or a scheme, there are the other occasions when we need to get deep into the corners of a design at a scale of 1:1. We’re probably reminded of Derek Zoolander’s famous exposé of scaled models when he determined that only ants could really benefit from them...Depending on the customer and the conversation there may be an element of truth in this.

tumblr_mrp1f6PchR1sfvo2qo1_500.gif

As models and designs are being created digitally then there is simultaneously the opportunity to create visual content and experiences that complement physical models, allowing a more comprehensive understanding of design progression and objectives. Virtual Reality offers a hitherto unheard of opportunity to explore a development at a human scale and get a real spatial understanding of a project years before it is built. 3D printing and 3D visualisation, therefore, go hand in hand as design communication tools.

Soluis Group is the UK’s most established visual communications agency for the built environment. They have been crafting beautiful and engaging experiences for almost twenty years. For Soluis, technology is a storytelling tool. Their experience has taught them to make the best use of the emerging tools available to them whilst always focusing on delivering the most memorable, informative and engaging content.

Soluis and Fixie 3D partnership

Fixie and Soluis will be championing the development of solutions that make the best use of our combined expertise - utilising 3D printing and emerging visualisation technologies to bring models alive. This could mean utilising 3D prints as triggers for Augmented Reality experiences, projection mapping visuals onto a 3D printed model or overlaying data onto masterplan models. The opportunities remain endless, creating enhanced models that become an even more valuable communications tool.

By combining forces we also have the ability to offer our respective clients a broader range of options and expertise - for anybody who is attending the AJ100 Awards dinner next week, you may get a sneak preview!


Ronan O'Boyle
Fixie Founding Team Expands
 

Fixie wants to ensure that our clients have access to the best knowledge and resources in the 3D printing and architectural model making industry. We’re striving to build a team that facilitates this. We’re therefore delighted that Lee Bassil, former Business Manager of Hobs 3D, is joining Michelle Greeff as Co-Founder and will head operations drawing on over 10 years of experience in various roles across the industry.

Lee has made his life 3D printing for the AEC sector. Together with Michelle (and starting with one single printer), he made Hobs Studio’s unique offering a reality - initially as a 3D Technician and then as Business Manager. Over the course of his career across the sector he has forged relationships through consistent, dedicated service with all of London’s top architecture firms; their print and model shops, along with other 3D Printers and Modelmakers.

Fixie will benefit from Lee’s experience establishing and growing numerous 3D printing departments. He will be pivotal in enabling Fixie’s bureau operations so that we can begin to print more of the files that we fix. This will allow us to self-sustain faster and also generate revenue to advance our objectives for the development of our online platform and international expansion. In the initial months, Lee will be getting his hands dirty once more, but as the business grows he will oversee all elements of production and operations as has been his long-held role until now.

Lee, with his father and Didi Hamann in Madrid at the 2019 Champions League final.

Lee, with his father and Didi Hamann in Madrid at the 2019 Champions League final.

Lee’s first week with Fixie was on the back of his trip to Madrid to watch his beloved Liverpool win the Champions League - his first week has been a slow one.

 
Fixing Series: Error No.2 - Bad Edges
 

“Bad Edges, Bad edges, Whatcha gonna do, whatcha gonna do
When they come for you?”

Inspired by Bob Marley

Bad Edges, are next on the list of potential errors that could affect your 3D print. For those not used to the terminology these sound like the types of shady characters your parents warned you about. The kind that would hang around the back of the school smoking cigarettes. If left to their own devices Bad Edges, like true troublemakers, will also lead you down the wrong path.

Fixie 3d printing file fixing bad edges

Bad Edges, as touched upon in our introductory post on model errors are a result of faces or more specifically triangles, not fully ‘knitting’ together. They’re so very close together that the gap between them is potentially not visible to the human eye.

Perhaps worthy of an analogy to drive the point home: Friends Season 3 Episode 2 - “The One Where No One’s Ready”. Chandler places his hand in front of Joey’s face, it’s definitely an invasion of his personal space but crucially it isn’t touching and therefore Joey can’t get mad. In a similar vein edges can be excruciatingly close but if the software doesn’t understand them to be touching then it cannot react in the necessary way.

3d Printing Bad Edges

So close, but not touching.

There are two main causes of Bad Edges, the first is likely to occur during the course of modelling: copying and pasting of parts and multiple iterations can easily lead to elements being microscopically misaligned. Secondly, bad edges can appear during the conversion of models between softwares. Some software may read the same information in a different way: what might work in one modelling programme may not for another - especially when we refer back to one of the key objectives of working with 3D printing software as opposed to building design software: to have a watertight model.

If not dealt with, Bad Edges mean that parts of your model have non-manifold edges (in this instance meaning that edges are connected to less than one face). 3D printing software requires that all edges are manifold: connected to two faces only. In practice, if this rule is followed your model will be watertight and have a thickness throughout (so you don’t need to worry about the terminology, just the process).

Although we often won’t be able to see these bad edges 3D printing software does. It highlights these minuscule gaps and facilitates a clean up process.

We’ll lead you down the right path to 3D printed model perfection, get in touch.

 
Fixie finds a home with Kandor Modelmakers


As a new company, we’ve been emboldened and encouraged by all of the conversations we’ve been having both with clients and potential collaborators. We’re continuing to define and refine what we offer - keeping an open mind has allowed many unexpected and rewarding discussions!

With Fixie we have our own independent aspirations of being the go-to solution for architectural 3D printing. Not only in London or the UK, but also building on the unique experience of creating the market in the UK to expand to cities worldwide.

We’re at the same time also keenly aware that 3D printing alone may not be the appropriate solution for all architectural models. We recognise the warmth and narrative that a hand finish adds to a detailed 3D print.

Kandor Modelmakers

Modelmaking tradition: James Stirling inspects a model with a young(er!) David Gomm, now a Director at Kandor Modelmakers.

Kandor Modelmakers have been working with the architectural sector for 40 years. Their wealth of experience and the quality of their craftsmanship has seen them help to communicate the visions of all leading architectural firms, time and time again.

Kandor and Fixie have a mutual understanding of the reciprocal need for technology to support craftsmanship and skill to complement efficiency. We’re therefore combining our resources under one roof.

Fixie and Kandor will be cohabiting in a 15,000 sq. ft. model workshop in Stratford. We will be offering the entire scale and spectrum of architectural model making utilising the most appropriate techniques and technologies for each project.

Our research is teaching us that architects don’t just require a 3D printing assistant, but are also in need of an architectural model making assistant that has a full working knowledge of 3D technologies. This means that architects can get support in the entire model making process irrespective of the software and processes they use internally.

By joining forces with Kandor we can easily transform the rigid precision of 3D printed models into warm and welcoming models that better help to tell the story. Along with undergoing a modernisation and rebranding process Kandor will be able to supplement their unrivalled model making capabilities with 3D printed elements and techniques.

If the project requires a simple 3D printed sketch model or a fully operational, interactive marketing model (or anything in between), we’re now proud and excited to be able to assist on any scale of project.

Looking forward to sharing more from our new home!

Michelle Greeff

Founder

 
Fixing Series: Error No.1 - Holes
 

“There’s a hole in my bucket Dear Liza, Dear Liza”

Harry Belafonte / Odetta Felious Gordon

Indeed, a hole in a model can cause all sorts of problems for 3D printing, but to understand why you will first need to understand some of the main principles of 3D printing and the file format that it uses - STL.

STL is short for Stereolithography, one of the earliest 3D printing technologies. Another definition “Standard Triangle Language” is perhaps more helpful in understanding the format. When a model is converted to STL format all surfaces are converted to a triangulated mesh, or in other words, many surfaces made up solely of triangles.


Fixie 3d printing triangle mesh

Triangles forming a mesh.

Fixie inverted normals 3d printing

Triangles showing their surface directions.

The STL format interprets each triangle as having a back and a front side, or an inside and an outside surface. If the triangles are facing the wrong way they’re known as flipped triangles. All of these need to be oriented in the right direction for 3D printing software to print as planned - it needs to know what is the inside of the model and what is the outside. We do not mean the inside and outside of a building or a room, but rather the inside and outside surface of a wall or other object that will be printed. This introduces us to another inherent characteristic of 3D printing - elements must have a thickness.

FIXIE 3D PRINTING SECTION

A helpful way to think about this is when you look at the section of a building. The thick lines of a wall or floor outline the volume that will be printed. The external edges of the walls face the open/void space of a room or the exterior of the model and the inside is the edge of the solid printed volume. (We explain more on basic file preparation of your model in an earlier post).

Each triangle should be facing the right way in the model mesh. Each should be knitted together (aka no gaps between them) and on a similar note there should be no holes or missing triangles.

Fixie 3d printing file fixing gaps & bad edges

Triangles not correctly stitched together, opening up gaps in the mesh. The broken edges this error leaves are called ‘bad edges’.

Fixie 3d printing file fixing holes

Large openings exposing the interior of the mesh. A hole also leaves bad edges as inevitably there will be edges not stitched together.

All of this relates to the fact that, to be printable, a model must be ‘watertight’. Take as an example your favourite mug (we also ‘Fix’ a lot of cups of tea and coffee at Chez Fixie)! The mug is undoubtedly watertight and has a good thickness to it. If the mug were an STL file all of the surface (inside and outside of the mug) would be covered with triangles showing their outside surface only. All would be correctly stitched together, with no missing triangles. If the mug were made up of no thickness, just a single face accounting for the interior and exterior of a mug then you’d quickly spill your tea.


To be printable:

  • A model must be solid

  • A model must have a thickness

Therefore, it must not have:

  • Gaps

  • Holes

  • Undefined or unreadable surfaces.

I think that’s enough for today, but we’ll soon share detailed information about holes and other issues and what they mean for your model. Generally, it’s not pretty!

Please get in touch directly with any related queries - fixers@fixie3d.com

 
Fixing Customer Experience
 

At Fixie, we’re determined to advance (or fix…) how the 3D printing industry interacts with the AEC sector. From listening to our clients across the architectural, construction, engineering and property industries we have uncovered two main frustrations:

The first comes from the client side and is often due to a lack of understanding of what is involved in the production of 3D printed models. This highlights the need for further education and the desire for transparency at all stages and in all aspects of the process.

It’s the experts’ role to help clients feel comfortable in the knowledge that they have a high level understanding of how a project should progress and of what potential obstacles may arise. The key aim should be zero surprises!

Another major frustration conveyed was around how the project and communications are managed between external stakeholders and internal production teams. Improving these channels of communication will help alleviate the aches of the first point above. This improvement is heavily reliant on efficient internal working processes.

 
Our clients will have full control and approval will be as easy as pressing (3D) print

Our clients will have full control and approval will be as easy as pressing (3D) print


At Fixie, we enjoy growing the community of 3D printing enthusiasts so we’re always actively educating our clients about the processes. However, we knew that the second frustration around transparency and frequency of communications could be tackled with a fresh injection of technology.

That’s why we’re thrilled to be introducing our new project tracking tool to the market. It’s our first innovation aimed at reducing friction in the 3D printing process - part of our plan to encourage greater adoption of 3D printing as the go-to solution for design communications. We’ll be sharing updates on progress over the coming weeks, but it’s fair to say that we can’t wait until we’re finished and can begin testing it with you on live projects.

 
Ronan O'Boyle
3D Printing Industry Article
 

We’re happy that Fixie are featured today in 3D Printing Industry!

It has taken a lot of long days and late hours of work to build Fixie from scratch. It’s nice to be able to share that work with the industry. We’re only getting started, but it’s nice to see the hard work paying off little by little, day by day.

3D Printing Industry summarised the first development of our service:

The Upload and Briefing tool generates quotes as well as consultation on the most relevant additive manufacturing processes for a building model. This includes Selective Laser Sintering (SLS), ColorJet printing, Stereolithography (SLA) and hand-finishing post-processing. Once satisfied, the company’s 24/7 file fixing service transforms the given digital designs into an optimized 3D printed model.

This reinforces the point that streamlining the briefing/information gathering stage is a vital part of improving the customer experience. It reminds us that our role is that of the consultant, the expert in our field and we need to guide you on the journey to finding the best solution before we can get our hands dirty with your file!

 
Ronan O'Boyle
Fixing and 3D printing a colour interior model

Fixing and 3D Printing a Colour Interior Model

As you may have seen on our Instagram, we were recently working with a colourful interior fit-out model. It brought up a few more issues than we anticipated and we’d therefore like to share how we overcame them.

(This is a specific use case of how a file is fixed – for a less technical description please follow our Fixing Series, which supports live project descriptions with a more general overview of 3D printing and file fixing principles.)

Starting Point: Importing the Model

The model was originally created in SketchUp and imported directly into our file preparation software. The textures and colours applied in SketchUp are also conveniently imported.

This can be both a blessing and a curse, as heavy textures can often slow down our software.

 
Bad edges and flipped triangles.png
 

Running Diagnostics on the Imported Model

Once imported, the model is run through a diagnostics check. This reveals all the errors in the model which must be fixed before it is printable.

Bad Edges and Flipped Triangles

As shown in the diagnostics image, this model had multiple errors indicated by coloured lines:

  • Bad edges (yellow) occur when triangles or surfaces are not properly connected, leading to gaps in the model mesh.

  • Flipped triangles or surfaces (red) indicate inverted geometry that will cause printing issues.

 
Fixie 3D Printing File Fixing Errors Single Surfaces
 

Why Single Surfaces Fail in 3D Printing

Single surfaces will not survive post-processing or may not print at all. All surfaces need to have a thickness in order to work in the 3D printing process.

Shell Thickness and Structural Integrity

Part thickness is determined by all the connected surfaces creating a shell. All parts must be one complete shell with no bad surfaces or holes in order for them to print successfully.

 
Fixie 3D Printing File Fixing Errors Shells
 

Understanding Shells in 3D Printable Models

A model can be made up of multiple shells, like those displayed in the image highlighted in green.

Why Multiple Shells Must Be Unified

Even a simple object like a chair can be made up of multiple separate shells — the legs, the back, the cushion, and even the screws if very detailed information has been supplied.

In order for the part to print correctly and not fall apart during the process, these shells need to be unified into a single shell.

The ultimate goal for any model is to create a single shell with no holes, bad edges, or inverted surfaces — in other words, no errors whatsoever.

The ultimate goal for any model is to create a single shell with no holes, bad edges or no inverted surfaces - in other words: no errors whatsoever!

File Fixing Workflow: Breaking Models into Parts

File fixing, like life, is all about breaking things down into manageable chunks to make it all seem achievable.

Once the model has been split into manageable parts, each part can be fixed individually, one at a time.

 
Fixie File Fixing 3D Printing Separate Parts
 

Post-Processing Benefits of Printing in Separate Parts

Breaking down a model can also help improve the overall finish, as it allows access to areas that require post-processing, such as hand finishing and brushing after printing.

All parts can be finished individually and assembled to bring the model together. While models can be 3D printed in one piece, breaking them down provides greater flexibility and finishing control.

 
Fixie 3D Printed Colour CJP Gypsum Powder Interior Model Cafe
Fixie 3D Printed Colour CJP Gypsum Powder Interior Model
 

Infiltration in CJP Gypsum Powder Printing

Another benefit of breaking the model up in CJP gypsum powder printing is infiltration.

How Infiltration Strengthens Colour Prints

Infiltration is the process of letting glue seep into the porous powder, giving the model strength and making the saturated colour come to life.

Common Gluing and Infiltration Mistakes

When gluing a model, it is vital that all surfaces are brushed meticulously to remove any loose surface material not removed by compressed air.

If uncured surface material remains, the end result will appear patchy and may give a bleach-like stain on the model’s surface.

Patchy Surfaces and Double Gluing

It is equally important that infiltration with cyanoacrylate is carried out quickly and efficiently. If the infiltrant dries at different speeds, shiny patches may appear — often referred to as double gluing.

All excess glue should be removed from the surface before drying to reduce the risk of these shiny effects.

Drying, Handling, and Aftercare for CJP Models

Infiltrated parts should be left to dry thoroughly before handling. Moisture can interfere with the drying process and result in white patches on the model.

Natural oils from fingers can also leave marks at this stage, so handling should be avoided until fully dry.

Preventing Discolouration and Damage

For aftercare, it is important never to get a CJP gypsum powder model wet. Water will react with the material and cause a bleaching effect.

Similarly, placing the model in direct sunlight will cause a CJP 3D printed model to discolour over time.

Final Thoughts

We hope this hasn’t been too much to take in and that, together with our supporting blogs, it helps make sense of the work we do for your models at Fixie.

If you’d like to know more, we’d love to hear from you directly at info@fixie3d.com.

File Prep: How to prepare your design model
 

Over the past number of weeks we have been happily at work on our first projects at Fixie! Some have been complex and involved, whilst others have only required a quick fix. However, in all cases we’ve noticed the same issues during the early stages. These are caused by the condition and content of the model supplied. They cause the entire quoting, fixing and printing process to be slowed down. We thought it would be good to share the key steps that can be taken prior to supplying your model to us in order to avoid this.

Before you start:

We recommend that you save a copy of your working file and label it ‘to print’ or similar. This ensures that any of the changes you make, that are purely to speed up the 3D Printing process, don’t affect your ongoing work.

1_Remove unnecessary layers

In the new file you have created take a quick look at the model to eliminate anything that isn’t needed in the print. This could mean sketch and draft elements and obviously any layers that are turned off, as you don’t need them. This is an important distinction as all layers in a model will be imported and turned on in our File Fixing software. This can often prolong the process as we need to identify what is actually required in the print. A little housekeeping at this stage will make a big difference.

 
Fixie 3D Model Printing Layer Control
 

2_Trees

Trees are very pretty. We like to see them in your designs. However, these have often been placed in the model as 2D elements, which are not printable, or as heavy and complex 3D elements. Both slow down the model assessment stage as they can make the file unworkable.

Trees can be printed at certain scales and SLS printed trees are pretty special. However, generally if you wish to have trees in a print we add these by hand afterwards. This creates a nice contrast and the only information we need for this is a tree plan - easy!

Fixie 3D Model Printing Trees

This process may be making you feel a little uncomfortable as it holds up a mirror to your modelling techniques, brutally exposes them to the cruel light of day and leads you on an unwanted introspective journey…But fear not, we’re all in it together and it’s the little things that go a long way to making the 3D printing process easier for all.

 
Fixie 3D Model Printing Flipping Out Screaming
 

3_People/Animation

Not dissimilar to trees: people and vehicles are placed into your digital model to add life. However, people are often too small to print (1:500, or 1:750 at a push, are probably the smallest scales that you would look to place people in a model). And depending where you took your vehicles from they could have the entire engine intricately modelled - this is the key point, if you can’t see it or it is an unnecessary level of detail then it shouldn’t be in the file!

4CCCA7CC00000578-5793345-image-a-18_1527810333559.jpg

4_Detail

Whether it’s Fork Handles or Four Candles: both are likely to be unnecessary in your model. In fact, if you’re only printing the exterior you can delete everything that’s internal (but don’t waste too much time on this as our software does it quickly - just delete those IKEA furniture layers!).

The main point with detail is to realise that if you have 500 door handles in a model, there are likely many other unnecessary elements that will slow down the process and ultimately add cost. To understand this point and what will actually appear at the scale you are printing, will also go a long way to understanding what is possible in 3D printing and what makes it possible.

If you have any related questions, please contact us at fixers@fixie3d.com, we’re here to help.

Your design is perfect, but your file may not be...

Fixie - it’s all in the name really: your design files need to be fixed before 3D Printing.

That’s why we set up Fixie, to scratch this task off your ever-expanding list. You’re the building specialists: we’re the 3D Printed model specialists!

 
Fix and Print_2@5x.png
 

Whilst sometimes there is only a small amount of file preparation, there are multiple factors which cause issues. This could be caused by how the digital model was originally made, how it was imported and interpreted by our 3D printing software and also how you would ultimately like to see your design represented. The requirements to make detailed features printable at different scales varies greatly. We don’t think it should be your job to worry about whether your design will 3D print or not!

We want to share all of these factors with you to help you understand the work we do at Fixie to get your model print ready, according to your specific brief.

Over the coming posts we will share our expertise on:

If you’d like further information, we’d love to hear from you directly.